Modern Painted Antlers

This post includes affiliate links. For the full disclosure policy click here.

Modern Painted Antlers

I grew up in a house of hunters. My husband also grew up in a house of hunters. We both lived with antlers and other taxidermy trophies and it was only a matter of time before they made it into our home as a couple. The only problem I had with this is the style or “look” they imply. See, we arent cabin, lodge, woodsy, etc kind of people within our own space. Its just not us. #nojudgement So a few coats of paint later and we are loving our “new” modern antlers!

Modern Painted Antlers

The set on the left is one Q actually hunted when he was a kid. They are sentimental and I’ve been trying to find a way to integrate them into our space for quite a while. The set on the right is from Target and completely ceramic. They are both ok on their own but neither fit our style or space.

Ive seen a bunch of tutorials and antler makeovers using spray paint but I really wanted to stick to the color pallet we chose for the living room. And finding those exact colors is basically impossible. So I used the Ceramcoat Select from Delta to mix my colors to an exact match. Its the first time I’ve used these satin finishes and I totally loved them!

Modern Painted Antlers

I separated the real antlers from the plaque to make painting easier. I wiped everything down with a damp rag to remove dust and thats it. Im not big on prep work… are you guys picking up on that? Ha!

Being that these would be mounted and nearly never handled I wasn’t too concerned with primers or sealers. I just laid out some newsprint and started slapping on the acrylic!

Modern Painted Antlers

[after 1 coat of acrylic paint]

Modern Painted Antlers

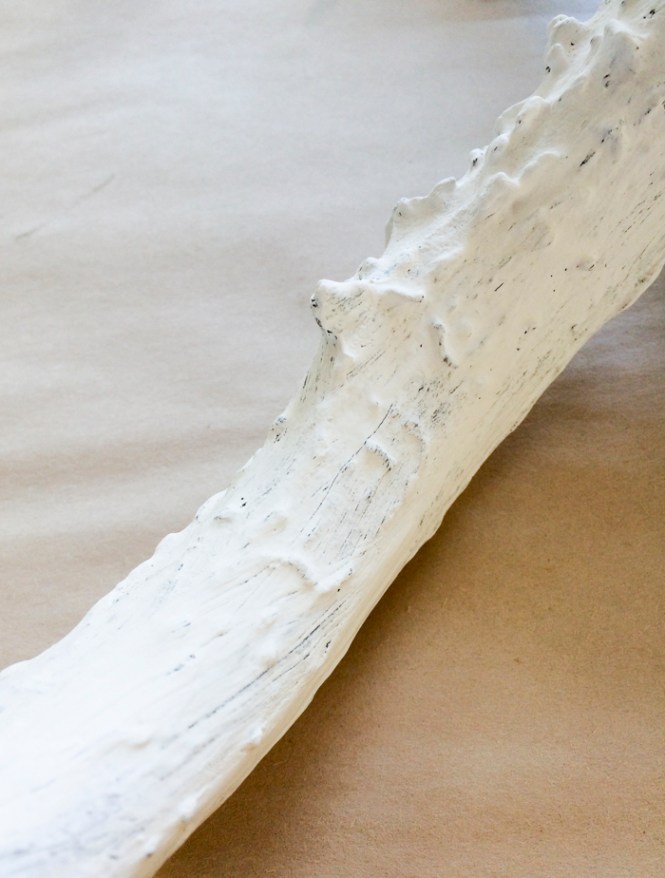
I used bristle brushes to really work the paint into the uneven surface of the antlers. It took 2 solid coats to get full coverage[see above for coverage after 1 coat] and I did a little bit of touch up on the real knobby bits.

Modern Painted Antlers

Painting over the fur was a bit different. It took 3 coats to really cover everything and I used a softer synthetic brush. Also, you need to paint with the grain so this dries “laying down”. The paint will make the fur stiff so you want to be aware of how you are directing it.

I let this dry for a full 24 hours before attempting to hang them up. And again, I did not seal these. If you wanted a different finish(glossy/high shine) Im sure you could hit them with a coat of spray on.

Modern Painted Antlers

Now lets talk hanging hardware. I’ve never been shy about decorating our walls whether we were renting or owned. And over the years I’ve tested a number of different hardware. I know that’s probably making some of you cringe because you’re team “don’t destroy the drywall”! But! I think I’ve found a pretty good compromise.

I picked up this multi-pack of hangers from High & Mighty a while ago and I’m thoroughly impressed! (No, I’m not affiliated with H&M) They can hold an insane amount of weight for their size and they only make a hole the size a thumbtack would leave. Thats tiny! And, even better, they’re a tool free product. #winning

Modern Painted Antlers

I am loving this makeover and I cant wait hear what a few of my “traditional hunters” think! So would you paint a set of antlers? Have you already given a taxidermy piece a mod makeover? You know I’d love to hear all about it in the comments!

Continue Reading

Painted Throw Pillows

This post includes affiliate links. For the full disclosure policy click here.

If you’ve been here recently you already know I have piles of throw pillows to keep my comfy level maxed out. You may also know I’ve painted throw pillows before. But after getting my hands on a new design for our living room I was itching to use those fabric painting tricks again. These painted throw pillows have a completely different feel than my first attempt but I think they are just as successful! Painted Throw Pillows

Originally, I ordered these pillow cases to use as is. And they did live happily on our wicker arm chair for some time. But after adding the throw blanket pillow cases and seeing how punchy the colors were I knew this pillow case needed something to liven it up!

Painted Throw Pillows

When I was considering how to add those punches of color I was reminded of star patterned quilts and adult coloring books. Both of them have negative space which I wanted to replicate to keep the design from getting too busy. I started playing with options in my sketch book and made sure the colors matched up with the other pieces already in the living room.

Painted Throw Pillows

Once I got the pattern mapped out and the colors finalized I set up for painting. The only prep you really need to do is wash/dry the pillow case and place a magazine(or other barrier) inside. This keeps the paint from bleeding through to the other side of your pillow case. You can also add a small amount of fabric medium to your paints. This will keep the painted sections pliable.

Painted Throw Pillows

I used a soft medium sized brush to fill in the larger portions of the design. This helped get most of the spaces filled quickly. I later filled in the edges with a small flexible brush. The paint will get a bit watered down in consistency from the fabric medium. Although, I found using a damp brush also helps with fluidity. This was mostly helpful when I was working on the edging. Be sure to add water sparingly as it may make your paint “bleed”.Painted Throw Pillows

It only took a few Netflix reruns to fill in the design and I think the pay off was well worth the time. So another throw pillow success in the books! Ha!

Painted Throw Pillows

Have you tried any throw pillow DIYs lately? Painted any fabric? Tell me all about it in the comments!

Painted Throw Pillows

Continue Reading

Marbled Planters

This post includes affiliate links. For the full disclosure policy click here.

I titled this “Marbled Planters” but honestly it could really be “Marbled Anything”.  I promise once you do this project you will be looking around wondering what else you could pour, swirl, and dip! Its so addictive you guys! And it only takes a few(very inexpensive!) supplies that you probably already have on hand.Marbled Planters

If you have a planter that has sections you’d like to mask off use painters tape. I wanted to keep the “raw edge” on my cement planters so I masked off those bottom portions. You could also use the tape to add a decorative design(double creative points for that!).

Once your planters are ready and your work surface is set up fill your container with water. You want enough to keep space between the surface paint and the bottom of your container. If you are marbling a large pot you might want something deeper as you might dip further down while rolling.

Start adding your nail polish in random swirling patterns. You aren’t creating the “marble effect” yet but you do want your colors to overlap. I only used 3 different colors but using more or less is totally doable! One tip I read and actually found helpful is keeping the bottles close to the surface while pouring. This keeps your paint from hitting the surface too hard and just sinking to the bottom of the water.

When you have your colors overlapped pretty well and the surface is covered you can start swirling! This is insanely satisfying! You need to work fairly quick because the polish starts to set up pretty fast. I didn’t use a “quick dry” polish and I still had to work quick so I would skip those varieties if possible.

Once you have a pattern you like start rolling your planters over the surface. The polish will basically cling to the surface of your planters. You shouldn’t have to dip too far into the water although I double dipped (deeper and/or more shallow) just to test it out.

If you’re working with more translucent colors overlapping your rolls and dips can create a pretty cool effect but it doesn’t look as “traditional”. Also, if you choose to work with those types of polish be warned your planter(and its original color) will most likely show through. I had a couple areas where the yellows showed through but its part of my current color scheme so I was ok with it. I’d highly recommend doing a “tester” or starting with a planter your willing to love just a lil less(LOL!) until you get the hang of it.

If you’re really attached to your current manicure you may want to use gloves. Ive always been a bare handed painter and seem to have a different pallet in my palm after my DIYs… I cant be the only one!? I think it was easier to handle the planters without having the extra slip factor of gloves but again, to each his own! And if you to dive in sans gloves fear not, a little polish remover or acetone takes off any marbling remnants in just a few swipes. But just to be safe you might want a few paper towels on stand by.

In between rolls you’ll also want to clean the surface. Again, the paint sets up pretty quick so you should be able to pull any extras off in sheets. I waited maybe an extra 30 seconds and ran a toothpick over the surface to pick up the remnants.

Let your finished planters cure up for a day or at least overnight. If you have any areas masked off check a small section before removing. If any of the paint starts to peel up with the tape you can run a utility knife along the edge to get a clean pull. This only happened  in one area for me and the paint was super thick in that section.

Now enjoy giving your old planters some new life! I’m completely obsessed and cant wait to marble some more items in our loft. Im sure I’ll be back shortly with more marbled projects!

Have you already jumped on the marble train? Done any notable planter DIYs? Tell me all about it in the comments!

Continue Reading

Throw Blanket Pillow Cases

This post includes affiliate links. For the full disclosure policy click here.

Throw pillows. Can you ever have enough? I think not! We have quite the collection throughout our home but the pile that lives on our couch really needed updating. Speaking of updating, the colors in our living room are all new for the loft which is so overdue. Ive been holding onto this color inspo board for sooooo so long and its finally getting used(YAY!). Only problem with that is finding pre-fab decor items in such punchy colors. So I’ve had to get extra creative and the throw blanket pillow cases were the perfect start!

As I said, the colors I picked(and LOVE!) are not ones I’ve been able to find right on the shelf in the items I need to replace. So when I found this cozy throw blanket at Target I snatched it up real quick. At first I thought I would just use it as a throw for couch snuggling and we did use it for a short time. But after trying and failing to find pillow cases in the right color I realized the throw was basically just a piece of fabric in the ideal shade.

Throw blanket pillow cases

After skimming a few tutorials on Pinterest I realized I could make these super basic and skip the time consuming details like zippers(double yay!). I love sewing. Really, I do. I’ve been doing it since I was a kid(thanks Mom!) and I’ve sewed everything from simple blankies to very detailed garments like my wedding dress. And as much as I appreciate intricate stitched items nothing beats the high of completing a project in 20 minutes! Yeah, you read that right! 20 minutes my peeps!

Throw blanket pillow cases

The very basics of my envelope pillow case: Trim off original rolled hem. Roughly measure enough fabric to cover pillows with 4″ overlap. Hem flap edges. Fold with right sides together so the hemmed edges overlap 4″. Stitch down both lengths. Turn right side out. Soooooo basic!

Throw blanket pillow cases

If you want to get really precise or if you are using a less forgiving fabric by all means to the math. Map out your cuts, iron your seams, and pin EVERYthing. I’m sure my old sewing teacher would recommend doing every single one of those steps! But! Being this fabric is a fleece with a stretch and it was going on slouchy pillows I skipped those deets and it all came out perfect. At least to my eye!

Throw blanket pillow casesThrow blanket pillow cases

One thing I will recommend is a walking foot. My machine is older and I’m sure its not the most fancy attachment but it makes a difference. When I hemmed the flaps(literally eyeballed it and folded over as I went) I used the regular foot. But once I folded the fabric over itself and started sewing it shut I was going over 3 thick layers of fleece. The walking foot kept everything moving smoothly and I promise its worth switching out!

Throw blanket pillow casesAlso, if you wanted to add a closure but still don’t want to deal with the hassle of a zipper a button would be perfect. Especially if it was something chunky, decorative, toggled, etc. Like I mentioned before, these pillows are super slouchy(which is why they’re so cozy!) so for now the envelope style sans closure is awesome. If I stumble upon a great decorative element later on I could still hand stitch it on. But for now these pillow cases are giving new life to our couch scene!

Throw blanket pillow cases

So have you repurposed any fabric lately? Cut up blankets for any other DIYs? You know I’d love to hear all about it in the comments!

Continue Reading